WHAT'S NEW?
Loading...
Showing posts with label monero. Show all posts
OverdriveNT configuration profile for  SAPPHIRE PULSE Radeon RX 550 2GB



[Profile_1]
Name=RX550
GPU_P0=214;800
GPU_P1=335;746
GPU_P2=503;750
GPU_P3=697;754
GPU_P4=874;756
GPU_P5=1019;856
GPU_P6=1043;881
GPU_P7=1071;725
Mem_P0=300;800
Mem_P1=625;800
Mem_P2=1900;800
Fan_Min=2000
Fan_Max=2800
Fan_Target=74
Fan_Acoustic=800
Power_Temp=85
Power_Target=0

XMRig is high performance Monero (XMR) OpenCL miner, with the official full Windows support.

https://github.com/xmrig/xmrig-amd

config.json

{
    "algo": "cryptonight",
    "background": false,
    "colors": true,
    "donate-level": 1,
    "log-file": null,
    "print-time": 60,
    "retries": 5,
    "retry-pause": 5,
    "syslog": false,
    "opencl-platform": 0,
    "threads": [
        { "index" : 0,
"intensity" : 432, "worksize" : 8,
"affine_to_cpu" : false, "strided_index" : true
},
{ "index" : 0,
"intensity" : 432, "worksize" : 8,
"affine_to_cpu" : false, "strided_index" : true
},{ "index" : 1,
"intensity" : 432, "worksize" : 8,
"affine_to_cpu" : false, "strided_index" : true
},
{ "index" : 1,
"intensity" : 432, "worksize" : 8,
"affine_to_cpu" : false, "strided_index" : true
},{ "index" : 2,
"intensity" : 432, "worksize" : 8,
"affine_to_cpu" : false, "strided_index" : true
},
{ "index" : 2,
"intensity" : 432, "worksize" : 8,
"affine_to_cpu" : false, "strided_index" : true
},{ "index" : 3,
"intensity" : 432, "worksize" : 8,
"affine_to_cpu" : false, "strided_index" : true
},
{ "index" : 3,
"intensity" : 432, "worksize" : 8,
"affine_to_cpu" : false, "strided_index" : true
},{ "index" : 4,
"intensity" : 432, "worksize" : 8,
"affine_to_cpu" : false, "strided_index" : true
},
{ "index" : 4,
"intensity" : 432, "worksize" : 8,
"affine_to_cpu" : false, "strided_index" : true
},
{ "index" : 4,
"intensity" : 432, "worksize" : 8,
"affine_to_cpu" : false, "strided_index" : true
}
    ],
    "pools": [
        {
            "url": "xmr-eu1.nanopool.org:14444",
            "user": "48PbjU72F2bSNwDuPEUVeQ2JHwcFSfdBQeuvr7DT1sUGjAmQgHiCGv3jkF8uQenShEhMg9QgZ6tDchf8dPoqfTUr8XVvQHP",
            "pass": "",
            "keepalive": true,
            "nicehash": false,
            "variant": -1
        }
    ],
    "api": {
        "port": 0,
        "access-token": null,
        "worker-id": null
    }
} 
After many trials and tribulations I finally have a stable setup on my 2x Vega 56 rig and wanted to share in hopes that others have some suggestions for improvement.

First configuration is for Gigabyte Radeon RX Vega 56 8G, 8192 MB HBM2


[Profile_0]
Name=GigabyteVega56
GPU_P0=852;900
GPU_P1=991;900
GPU_P2=1084;900
GPU_P3=1138;900
GPU_P4=1150;900
GPU_P5=1202;900
GPU_P6=1112;950
GPU_P7=1272;950
Mem_P0=167;900
Mem_P1=500;900
Mem_P2=700;900
Mem_P3=930;900
Fan_Min=3000
Fan_Max=4900
Fan_Target=60
Fan_Acoustic=2400
Power_Temp=75
Power_Target=-4

Configuration for SAPPHIRE PULSE Radeon RX Vega56 8G HBM2


[Profile_1]
Name=SapphireVega56Pulse
GPU_P0=852;900
GPU_P1=991;900
GPU_P2=1084;900
GPU_P3=1138;900
GPU_P4=1150;900
GPU_P5=1202;900
GPU_P6=1212;905
GPU_P7=1407;950
Mem_P0=167;900
Mem_P1=500;900
Mem_P2=800;900
Mem_P3=950;900
Fan_Min=1000
Fan_Max=2650
Fan_Target=60
Fan_Acoustic=2000
Power_Temp=81
Power_Target=0

This guide is specific to computers with ARMv7 Processors ONLY, Eg Raspberry Pi 2/3

Current Monero Version: 0.12.0.0 Lithium Luna

  • Add an unprivileged monero user:
    $ sudo adduser monero

  • Change to this new user:
    $ sudo su monero
    $ cd


  • Extract monero.tar.gz:
    $ tar -xvf monero.tar.gz
    $ mv monero-v0.12.0.0 monero

  • Copy the blockchain over:
    $ rsync -axvP /where/ever/you/have/your/.bitmonero/ monero@raspberryPiIP:/home/monero/.bitmonero/
    or
    zip it and copy it over in some other way

  • Make sure permissions are correct:
    $ chown monero: -R /home/monero/.bitmonero

  • Create a service so monerod starts automatically on boot.
    $ exit
    $ sudo vim /lib/systemd/system/ and add this:
    [Unit]
    Description=Monero's distributed currency daemon
    After=network.target
    [Service]
    User=monero
    Group=monero
    Type=forking
    ExecStart=/home/monero/monero/monerod --confirm-external-bind --restricted-rpc --rpc-bind-ip 0.0.0.0 --fluffy-blocks --block-sync-size 1 --detach
    KillMode=process
    Restart=on-failure
    TimeoutSec=120
    [Install]
    WantedBy=multi-user.target

  • Enable the service you just created:
    $ sudo systemctl enable monerod
    $ sudo systemctl start monerod

  • Check the logs to see if the service is running properly:
    $ sudo tail -f /home/monero/.bitmonero/bitmonero.log

  • (Optional) You might want to add some credentials to your RPC server. Run /home/monero/monero/monerod --help for more information

Another complete and good tutorial here
https://github.com/peanutsformonkeys/raspberry-monerod
The first step in getting your blockchain unstuck is making sure that no Monero related process is running anymore. Thus, use your task manager to check whether all Monero related processes are closed. Alternatively, you could simply reboot.
Now that no Monero related processes are running anymore, delete p2pstate.bin. On Windows it can be found in the following directory:
C:\ProgramData\bitmonero
Note that, by default, the ProgramData directory is hidden. Therefore, use the explorer to manually navigate to aforementioned directory.
On Linux and Mac OS X:
$HOME/.bitmonero
This directory is hidden by default too. On Linux you can use CTRL + H to unhide directories (note that this might not work on all Linux distributions), whereas on Mac OS X you can use cmd-shift-dot unhide directories.
After you've deleted p2pstate.bin you can restart monerod. If this didn't resolve your issue, please read further and make sure monerod is closed again.
We're going to add the following flag:
--block-sync-size 10
This will change the batch of fetched blocks from 20 to 10.
You can add the flag as follows:
If you are using the GUI, simply add --block-sync-size 10 as daemon startup flag. You can do this on the Settings page of the GUI.
If you are using the CLI, please see below.
On Windows make sure to launch it from the command line. Go to the folder monerod is located and make sure your cursor isn't located on any of the files. Subsequently do SHIFT + right click and it will give you an option to "Open command window here". Lastly, type the following command:
monerod --block-sync-size 10
On Linux and Mac OS X you should use the terminal to launch monerod. Note that this has to be done from the directory monerod is located in. The command is as follows:
./monerod --block-sync-size 10
If your blockchain is still stuck after adding this flag, please browse again to C:\ProgramData\bitmonero (Windows) or $HOME/.bitmonero (Linux and Mac OS X), open bitmonero.log and check it for any errors. If you see any of these errors (or similar to them), your blockchain is most likely corrupted and you need to resync from scratch.
Error opening database: Failed to query m_blocks: MDB_BAD_TXN: Transaction must abort, has a child, or is invalid
Failed to parse and validate tx from blob (per MoneroMooo: This can be a corrupt blockchain, if this comes from a block inside the db. However, it's much more likely to be an old version not knowing about a new fork)
This is done by deleting data.mdb from C:\ProgramData\bitmonero\lmdb (Windows) or $HOME/.bitmonero/lmdb (Linux and Mac OS X), which will trigger the resync.
This a step by step guide on how to setup your own  monero mining pool. Remember: you must be logged in as root.

# System Updates and Pool Requirements
yes | sudo apt -y --force-yes update
yes | sudo apt -y --force-yes upgrade
sudo apt install git libssl-dev libboost-all-dev build-essential tcl curl gcc g++ cmake -y

# Install Redis
cd /tmp
curl -O http://download.redis.io/redis-stable.tar.gz
tar xzvf redis-stable.tar.gz
cd redis-stable
make
make test
sudo make install
sudo mkdir /etc/redis
sudo cp /tmp/redis-stable/redis.conf /etc/redis
sudo adduser --system --group --no-create-home redis
sudo mkdir /var/lib/redis
sudo chown redis:redis /var/lib/redis
sudo chmod 770 /var/lib/redis

# Update Redis Files
# Change line that starts with "supervised no" to "supervised systemd"
sudo sed -i 's/supervised no/supervised systemd/g' /etc/redis/redis.conf
# Change line that starts with "dir ./"  to "dir /var/lib/redis"
sudo sed -i 's/dir .\//dir \/var\/lib\/redis/g' /etc/redis/redis.conf

# Install Node 0.10.48
cd /tmp
curl -O https://nodejs.org/download/release/v0.10.48/node-v0.10.48-linux-x64.tar.gz
tar xzvf node-v0.10.48-linux-x64.tar.gz
sudo cp /tmp/node-v0.10.48-linux-x64/bin/node /usr/bin/
sudo cp -R /tmp/node-v0.10.48-linux-x64/lib/* /usr/lib/
sudo ln -s /usr/lib/node_modules/npm/bin/npm-cli.js /usr/bin/npm

# Install Pool
cd /tmp
git clone https://github.com/CanadianRepublican/monero-universal-pool.git pool
sudo mv ./pool /opt/pool
cd /opt/pool
npm update

# Firewall Setup
sudo ufw allow http
sudo ufw allow https
sudo ufw allow 3333
sudo ufw allow 5555
sudo ufw allow 7777
sudo ufw allow 8888

// The config file will need some configuring to work
cp ./config_backup.json ./config.json

sudo cp ./utils/redis.service /etc/systemd/system/redis.service
sudo systemctl start redis
sudo systemctl enable redis

// run the pool
node init.js

How To Start

We must install bitmonerod daemon software that ships with the Monero tree. It is a console program, and manages the blockchain. While a bitcoin wallet manages both an account and the blockchain, Monero separates these: bitmonerod handles the blockchain, and simplewallet handles the account.
This guide assumes you have already set up your VPS account and are using SSH to tunnel into the server console.

Linux, 64-bit (Ubuntu)

Make sure that port 18080 is open

bitmonerod uses this port to communicate with other nodes on the Monero network.
Example if using ufw: sudo ufw allow 18080 Example if using iptables: sudo iptables -A INPUT -p tcp --dport 18080 -j ACCEPT

Download the current Monero Core binaries

wget https://downloads.getmonero.org/linux64

Make a directory and extract the files.

mkdir bitmonero
tar -xjvf linux64 -C bitmonero

Launch the daemon

cd bitmonero
./bitmonerod

Options:

Show list of all options and settings:
./bitmonerod --help
Launch the daemon as a background process:
./bitmonerod --detach
Monitor the output of bitmonerod if running as daemon:

tail -f .bitmonero/bitmonero.log
Monero (XMR) is one of multiple new cryptocurrencies with its own blockchain network. You can participate in this network by setting up a node which synchronizes with the global distributed blockchain and let it run to strengthen the network.

 To mine SOLO you will need to setup your local daemon (node). After compiling and starting up it connects to some other nodes and synchronizes its database. This took many hours!! Solo mining it will be hard to get yourself a block, if you not have a really big hash power it’s a gamble.


Connect here and download the node for your platform 

https://github.com/monero-project/monero/releases

Extract to a given folder and start monerod. This is the daemon which will now start syncing and the operation can take many days!

The monerod daemon uses a database to store the blockchain, so normally it doesn't need anything special to save, as it should always be in a good state. However, an OS crash (or OS/filesystem bug) could cause some disk writes to be lost, causing corruption so we must use special command to save the work. Run the daemon using one of these command line options:

monerod  --db-sync-mode safe --block-sync-size 20

or

monerod  --block-sync-size 20


Remember: "--db-sync-mode safe " option it's a lot slower but more secure. To check your blockheight type status into monerod, the blockheight should be equal to the blockheight reported on MoneroBlocks https://moneroblocks.info/ in order to be fully synced.

Use the command exit to stop it gracefully. You must write: exit and press return button in the console. If you do not do this, maybe you have to resync from scratch everything!

If you do not use "db-sync-mode safe" and your PC crash, you wil have blockchain database (LMDB) corruption. The easiest way to fix it is to rename your corrupt lmdb folder to something else, for example: rename C:\ProgramData\bitmonero\lmdb to C:\ProgramData\bitmonero\lmdb-old and run monerod again. It should start without errors and it will again create a fresh copy of C:\ProgramData\bitmonero\lmdb and sync from scratch. It will take some time to catch up with the network again, though.

If everything is slow and after many days you are stuck, you can try this other solution. Importing the blockchain file directly:

Download https://downloads.getmonero.org/blockchain.raw

copy the file in your monero directory and import the file
monero-blockchain-import.exe --verify 0 --input-file ./blockchain.raw

after the import, you can delete the raw blockchain download as it is no longer needed. Read here for further instructions

https://github.com/monero-project/monero/blob/master/src/blockchain_utilities/README.md

Because we want to mine solo with CPU and GPU, you must use an external miner that connects to our pool (to not have to share the machine between the node and the miner). We chose to set up the monero-stratum solo mining pool on the machine that already hosts the node.

Download and install Redis Database for Windows

https://github.com/MicrosoftArchive/redis/releases

Download and install Python 2.7

https://www.python.org/download/releases/2.7/

Download and install OpenSSL

https://s3.amazonaws.com/brave-deps/OpenSSL/Win64OpenSSL-1_0_2j.zip

Download and install NodeJs for Windows

https://nodejs.org/en/download/

After the install, first you can execute scripts on your system by running the following command from an elevated PowerShell. To run PowerShell as Administrator, click Start, search for PowerShell, right-click PowerShell and select Run as Administrator.

Set-ExecutionPolicy Unrestricted -Scope CurrentUser -Force

Then, to install and use this upgrader tool, run the following command (also from an elevated PowerShell or cmd.exe).

npm install --global --production npm-windows-upgrade
npm-windows-upgrade --npm-version latest
npm install -g node-gyp
npm config set msvs_version 2017 --global
npm config set python python2.7
npm install redis
npm install dateformat
npm install cli-color
npm install async
npm install bignum
* If you have an error like the following, delete or rename "
youtuername.node-gyp" to somethingelse
C:\Users\.youtuername.node-gyp\0.12.7\Release\node.lib : fatal error LNK1106: invalid file or disk full: cannot seek to 0x....
npm install base58-native
npm install multi-hashing
* error ..\multihashing.cc(93): error C2039: 'New': non è un membro di 'v8::String' [C:\node_modules\multi-hashing\build\multih
ashing.vcxproj]
If you have the previuos error, install https://github.com/clintar/node-multi-hashing and move it to node_modules folder.
npm install nan@latest
stuck here "multihashing.cc(38): error C3861: 'NanScope':"
Download

https://github.com/zone117x/node-cryptonote-pool/archive/master.zip

unzip in C:\node-cryptonote-pool-master

open command line and go inside the directory

cd C:\node-cryptonote-pool-master

You need to copy the config_example.json to active configuration so your pool start working,  copy  config_example.json to config.json edit this file to configure the pool, more info here:


after configuration use this command to start the pool

node init.js


Xmr stak by default will try to allocate large pages. This means you need to "Run As Administrator" on Windows and you need to edit your system's group policies to enable locking large pages.

Unfortunately, Windows 10 Home doesn't have gpedit.msc to enable the Lock Pages in Memory Option.

The solution is to download and install Windows Server 2003 Resource Kit Tools from microsoft website. The Microsoft Windows Server 2003 Resource Kit Tools are a set of tools to help administrators streamline management tasks such as troubleshooting operating system issues, managing Active Directory, configuring networking and security features, and automating application deployment.

https://www.microsoft.com/en-us/download/details.aspx?id=17657

Run the setup file rktools.exe as Administrator and ignore incompatiablity warning during installation.

Open and run the command prompt as an admin (right click and select from the menu)

In the command line write

C:\WINDOWS\system32>ntrights -u "mywindowsaccountemaillogin" +r SeLockMemoryPrivilege

you must replace mywindowsaccountemaillogin with your current windows username or email.

To find your Windows username, follow the instructions below. 
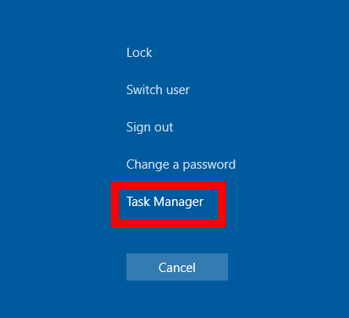
1. Hold down the Ctrl and Alt keys on your keyboard and press the Delete key once.
  • You can also search for "Task Manager" in the Start menu.
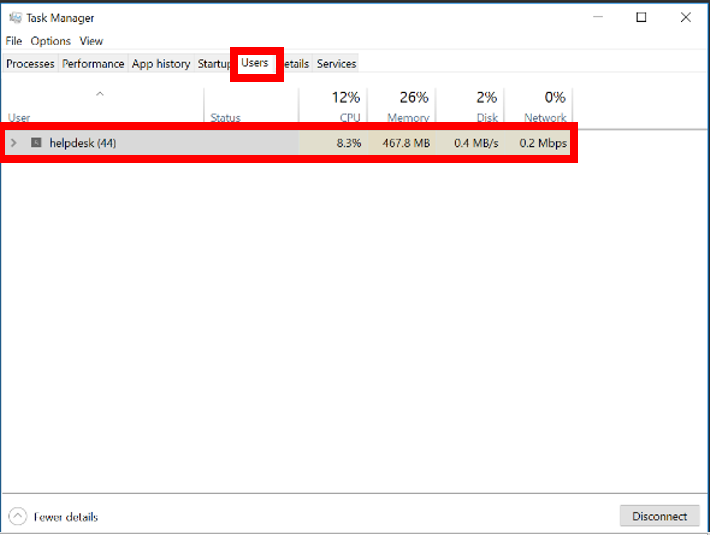
​2. Click on "Task Manager."
    

3. In the new menu, select the "Users" tab. Your username will be listed here.


As result if everything is going well, the system will answer with this message:

 Granting SeLockMemoryPrivilege to mywindowsaccountemaillogin    ... successful

Now reboot your PC!


XMR-Stak is a universal Stratum pool miner. This is the CPU-mining version and we are using a fresh Ubuntu 16.04 install

sudo apt-get --assume-yes update
sudo apt-get --assume-yes install libmicrohttpd-dev libssl-dev cmake build-essential libhwloc-dev screen git nano
git clone https://github.com/fireice-uk/xmr-stak-cpu.git
cd xmr-stak-cpu
cmake .
make install
cd bin/
chmod +x xmr-stak-cpu
./xmr-stak-cpu
Edit bin/config.txt file and also make sure to edit the following lines:


"pool_address" : "xmr-eu1.nanopool.org:14444",
"wallet_address" : "43x4C2pwcvWgGS9Mb9sCcY9SxFjthrk92YM3dT1VHR8QNc4kpj2MJfGQYAYKWBp2s9R9s6sheFx7DWCUezRkZrehDzenTqd",
"pool_password" : "",

After you have the config.txt edited correctly simply run xmr-stak-cpu. If you run into issues related to mmap this means you need to enable hugepages. To do this type the following commands: 

sysctl -w vm.nr_hugepages=128

nano /etc/sysctl.conf

At the end of the sysctl.conf file add:

vm.nr_hugepages=128

More info here
https://www.cryptocurrencyfreak.com/2017/08/22/monero-mining-xmr-stak-cpu-ubuntu-16-04/
XMR-Stak is a universal Stratum pool miner. In this example we will compile the CPU-mining version

  1. Download Microsoft Visual Studio Express 2015/2017 https://www.visualstudio.com/vs/visual-studio-express/
  2. Download jquesnelle xmr-stak-cpu fork https://github.com/jquesnelle/xmr-stak-cpu/archive/master.zip
  3. Unzip in C:\ so you have the dir C:\xmr-stak-cpu-master
  4. Open C:\xmr-stak-cpu-master\visualstudio\xmr-stak-cpu.sln
  5. After Visual Studio is started, wait to load all project file and compile the project (CTRL+MAIUSC+B)
  6. Visual Studio create C:\xmr-stak-cpu-master\bin\xmr-stak-cpu-notls-nohttpd.exe
  7. Copy C:\xmr-stak-cpu-master\config.txt in C:\xmr-stak-cpu-master\bin\
  8. Edit with Notepad config.txt
You must edit config.txt in particular these lines, put your Monero and Pool addresses

"pool_address" : "xmr-eu1.nanopool.org:14444",
"wallet_address" : "43x4C2pwcvWgGS9Mb9sCcY9SxFjthrk92YM3dT1VHR8QNc4kpj2MJfGQYAYKWBp2s9R9s6sheFx7DWCUezRkZrehDzenTqd.example",
"pool_password" : "",

and these lines, put "donate_percent" : 0.0

"donate_percent" : 0.0,
"donate_pool_address" : "",
"donate_wallet_address" : "",
"donate_pool_password" : "",

start the xmr-stak-cpu-notls-nohttpd.exe file in the cmd console and you can see the result

XMR-Stak-CPU mining software, CPU Version.
Based on CPU mining code by wolf9466 (heavily optimized by myself).
Brought to you by fireice_uk under GPLv3.

Configurable dev donation level is set to 0.0 %

You can use following keys to display reports:
'h' - hashrate
'r' - results
'c' - connection

Monero mining is more efficient on GPU but its technically totally possible to do it on a Raspberry CPU. The Raspberry is an 32bit processor and the cpu miner is 64bit only, you have to recompile it. If you are able to acquire raspberry pi at no cost and have no power cost its possible and would be proficient. You must avoid solo mining and must use a pool to have some results.


I assume that you have Raspbian or Ubuntu 14/16 as the OS Linux distribution installed under your Raspberry Pi. Due to the lack of a GPU, with a Raspberry Pi we have to use the CPU. Let's start!

Do a SSH connection to your Raspberry Pi, become ROOT and download the needed development libraries with apt:

sudo -i


apt-get update -y


apt install autoconf libcurl4-openssl-dev libjansson-dev openssl libssl-dev gcc gawk automake git -y

git clone https://github.com/lucasjones/cpuminer-multi.git


cd cpuminer-multi

./autogen.sh


Now optimize the build for your Raspberry version
You can read more infos about this here https://gist.github.com/fm4dd/c663217935dc17f0fc73c9c81b0aa845


As for mining, you’ll need to create a Monero wallet https://mymonero.com/ and find a pool to join. Mining in a pool means you get a small part of the reward for the mining you do. In our example we use Nanopool https://xmr.nanopool.org/help

To start the mining we use the minerd command

/usr/local/bin/minerd -a cryptonight -o stratum+tcp://xmr-eu1.nanopool.org:14444 -u stratum+tcp://xmr-eu1.nanopool.org:14444 -u yourmoneroaddress.raspberry -p yourpassword -t 2 

For example

/usr/local/bin/minerd -a cryptonight -o stratum+tcp://xmr-eu1.nanopool.org:14444 -u stratum+tcp://xmr-eu1.nanopool.org:14444 -u 43x4C2pwcvWgGS9Mb9sCcY9SxFjthrk92YM3dT1VHR8QNc4kpj2MJfGQYAYKWBp2s9R9s6sheFx7DWCUezRkZrehDzenTqd.raspberry -p yourpassword -t 2

NOTE: on the command line the {key}.raspberry -p password, the .raspberry (worker name) and the password can be anything you invent yourself.
REMEMBER to replace the wallet address dot worker name with your own.
Set the t parameter equal to the number of cores your cpu has.  So if you have a 4 core cpu then it would be -t 4

In the console you will see, something like this

[2017-10-20 17:08:09] Using JSON-RPC 2.0
[2017-10-20 17:08:09] CPU Supports AES-NI: NO
[2017-10-20 17:08:09] Starting Stratum on stratum+tcp://xmr-eu1.nanopool.org:14444
[2017-10-20 17:08:09] 2 miner threads started, using 'cryptonight' algorithm.
[2017-10-20 17:08:09] Pool set diff to 120001
[2017-10-20 17:08:09] Stratum detected new block
[2017-10-20 17:08:10] thread 0: 26925360 hashes, 0.00 H/s
[2017-10-20 17:08:10] thread 1: 26925368 hashes, 0.00 H/s
.....
[2017-10-20 19:29:00] thread 1: 29985080 hashes, 0.00 H/s
[2017-10-20 19:29:35] thread 1: 29985080 hashes, 0.00 H/s
[2017-10-20 19:29:36] accepted: 1/1 (100.00%), 3.23 H/s at diff 120001 (yay!!!)

It works fine but the only issue is its only shows Hash rate if the share is accepted. Note that with some pools, your Hash Rate will be reported as zero for most of the time, until you suddenly submit a 'share' to the pool from your mining efforts. You will temporarily see your Hash Rate reported, after which it will return to zero. This is normal for some pools, and you do not need to worry that something is not working correctly. As long as after a while you see the "total hashes submitted" figure increase, then your mining setup is working. 
If you want limit CPU usage (75%) you install cpulimit

apt-get install cpulimit

and use

cpulimit -e minerd -l 75 -b 

To keep the miner running at all times, we should set up a daemon to run in the background. In Raspian you must install systemd using:

apt-get install systemd

Systemd, if being used, is the first processes executed in user space in the Linux startup process. If init was used then the first process would have been init. The first process will be the root of the user space’s process tree.

Let’s move to the system and make a service file:
cd /lib/systemd/system/

nano miner.service
and copy in

[Unit]
Description=monero miner daemon
[Service]
ExecStart=<put your minerd command here, example /usr/local/bin/minerd etc etc> 
Restart=always
User=root
Group=root
[Install]
WantedBy=multi-user.target
and Ctrl + X to save it and then reload it with:

systemctl daemon-reload
systemctl enable miner.service
systemctl start miner.service
If the service (minerd) dies, don't worry, Linux will start it again automatically. BTW, the minerd service will start up automatically on every boot.

To View the stdout/stderr of the systemd service

Just use the journalctl command, as in:
journalctl -u miner.service
Or, to see only log messages for the current boot:
journalctl -u miner.service -b