
Set the "SSL Enabled" property to True.
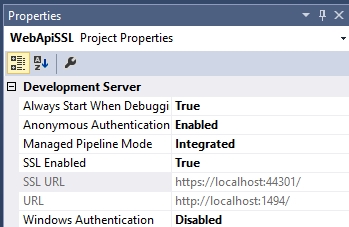
Once you change the value, Visual Studio set in automatic the SSL URL, e.g., https://localhost:44301/
You’ll likely get a message in the browser saying that the localhost address is not trusted, you can continue to the website at your own risk. The problem is that the certificate that was installed automatically for you by Visual Studio is not trusted. The certificate must be imported into the trusted root certification authorities folder.
You may recover, provided you have the certificate in your local store. To recover your certificate, perform the following steps:
-
Navigate to Start, click Run, then enter MMC.
-
Click File, then click Add/Remove Snap-in.
-
Click Certificates, then click Add.
-
Click Computer Account, then click Add.
-
Choose Local Computer.
-
Choose the Personal Certificates folder.
-
Locate and highlight the certificate with the error.
-
Right-click Copy.
-
Move to the Trusted Root Authority and right-click Paste.

0 comments:
Post a Comment